A Fast and Safe Way to Delete Duplicate Files on Mac, iPhone, and iPad
After scanning your Mac or iPhone and finding hundreds (or thousands) of duplicate files cluttering your system, manually selecting them one-by-one can waste 20-30 minutes or more. This is especially common when cleaning up duplicate files from cloud storage on Mac (for example, iCloud and synced provider folders). Auto Select solves this by automatically marking all duplicates for deletion in seconds while keeping one safe copy of each file. For typical scans with 1,000+ duplicates, Auto Select saves you 15-30 minutes compared to manual selection. On iPhone and iPad, Auto Select works the same way for files the app can access through Files.
What Auto Select Does
Auto Select keeps one copy per duplicate group and marks the rest for deletion. For a typical scan with 1,000 duplicate files, Auto Select completes the selection in a few seconds compared to 20-30 minutes of manual clicking. You control which copy to keep with two simple modes:
- Keep Oldest: Preserves the earliest created file in each group
- Keep Newest: Preserves the most recently created file in each group
The key safety feature: Auto Select only marks files for deletion, nothing gets deleted until you review and confirm. You stay in complete control.
How to Use Auto Select
Using Auto Select takes just a few clicks:
-
Scan for Duplicates
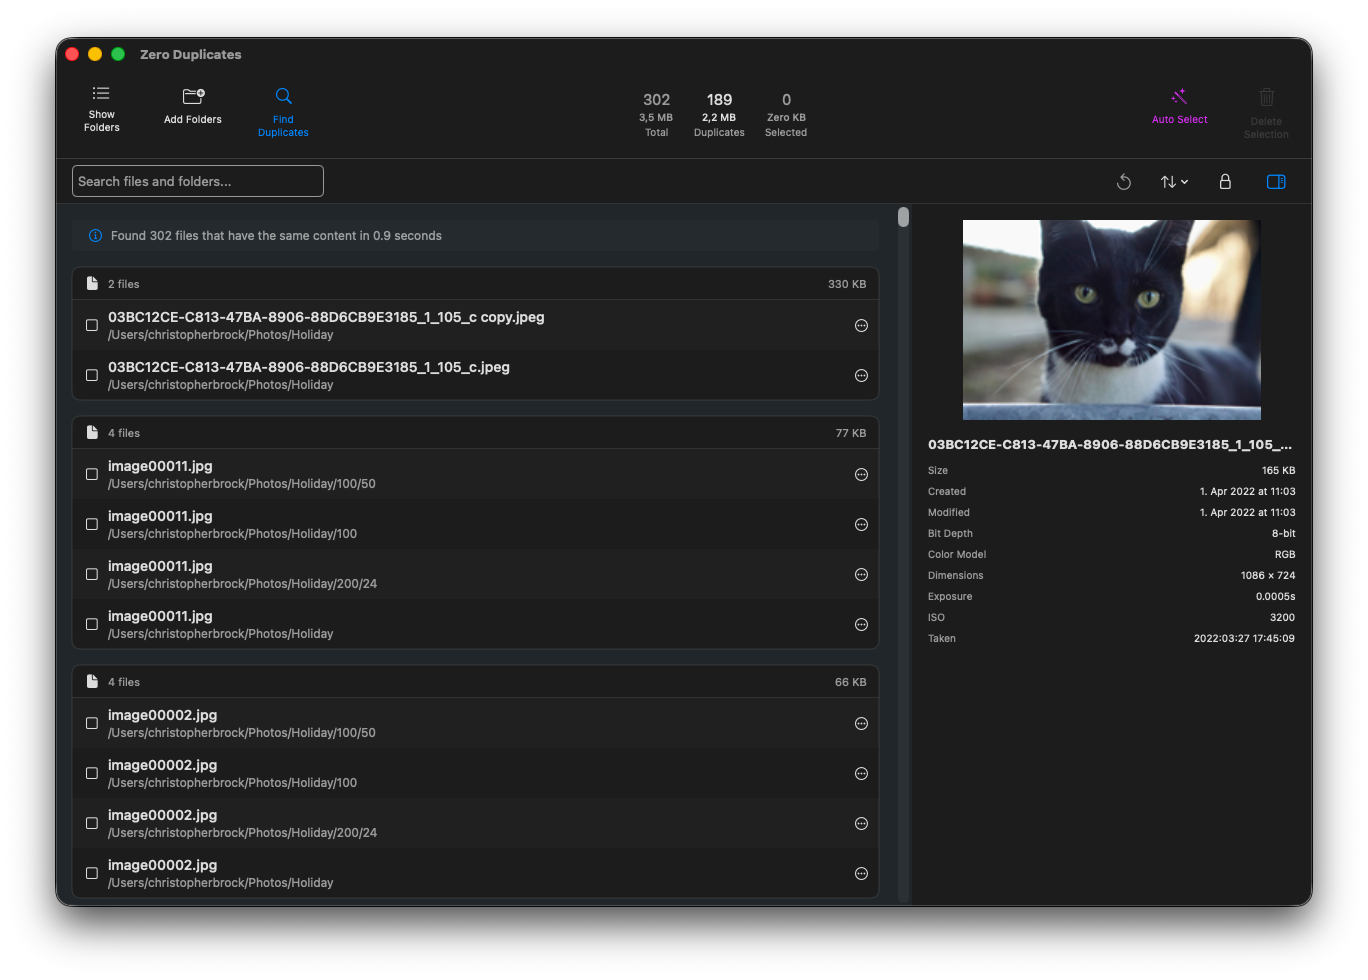
Click "Find Duplicates" to scan your selected folders. Once the scan completes, you'll see all duplicate groups organized by content.
-
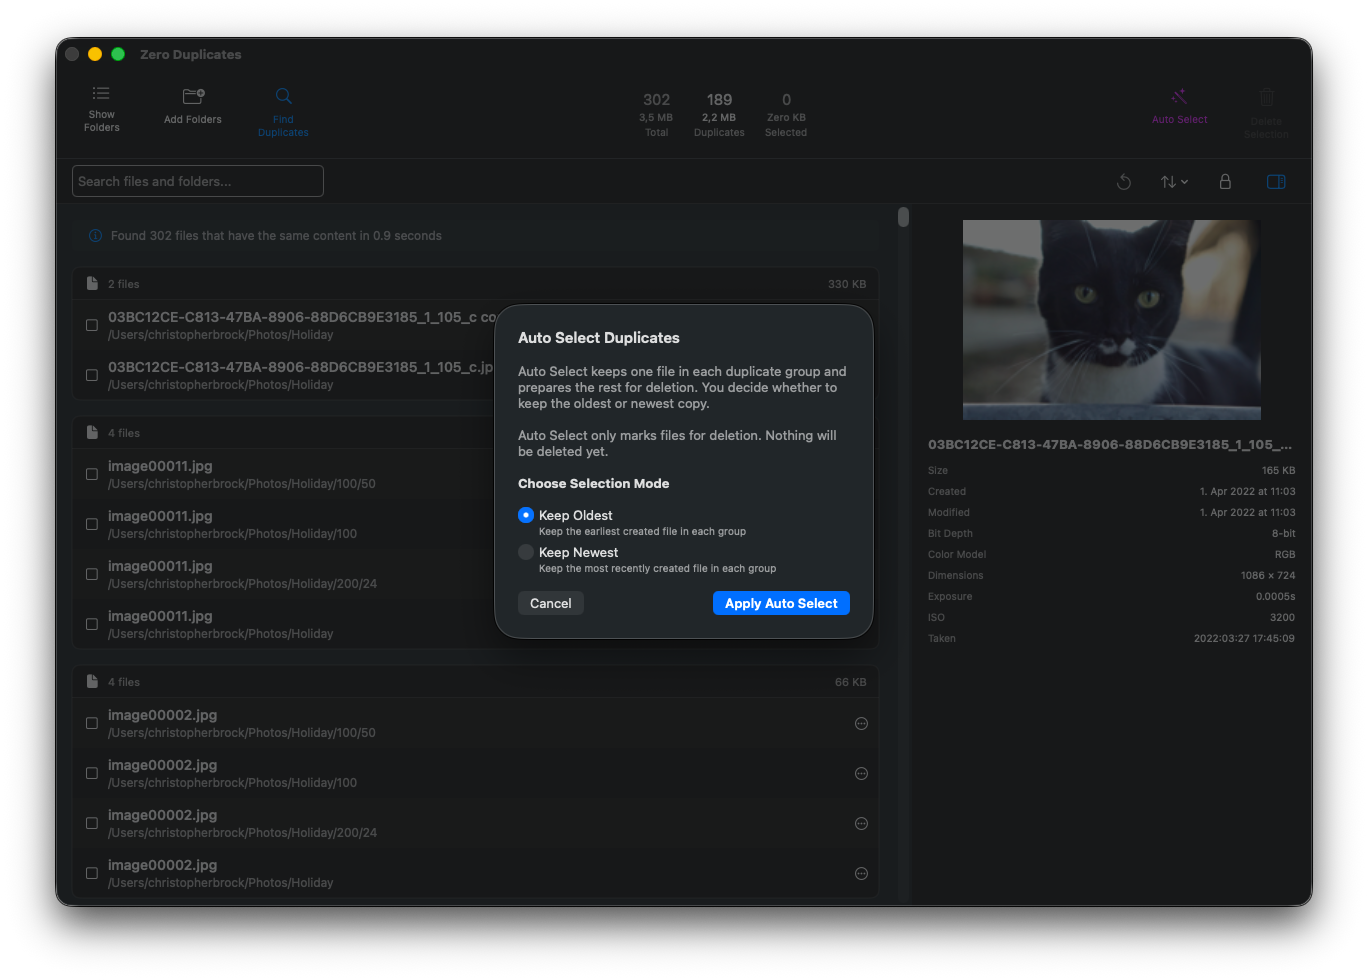
Click Auto Select
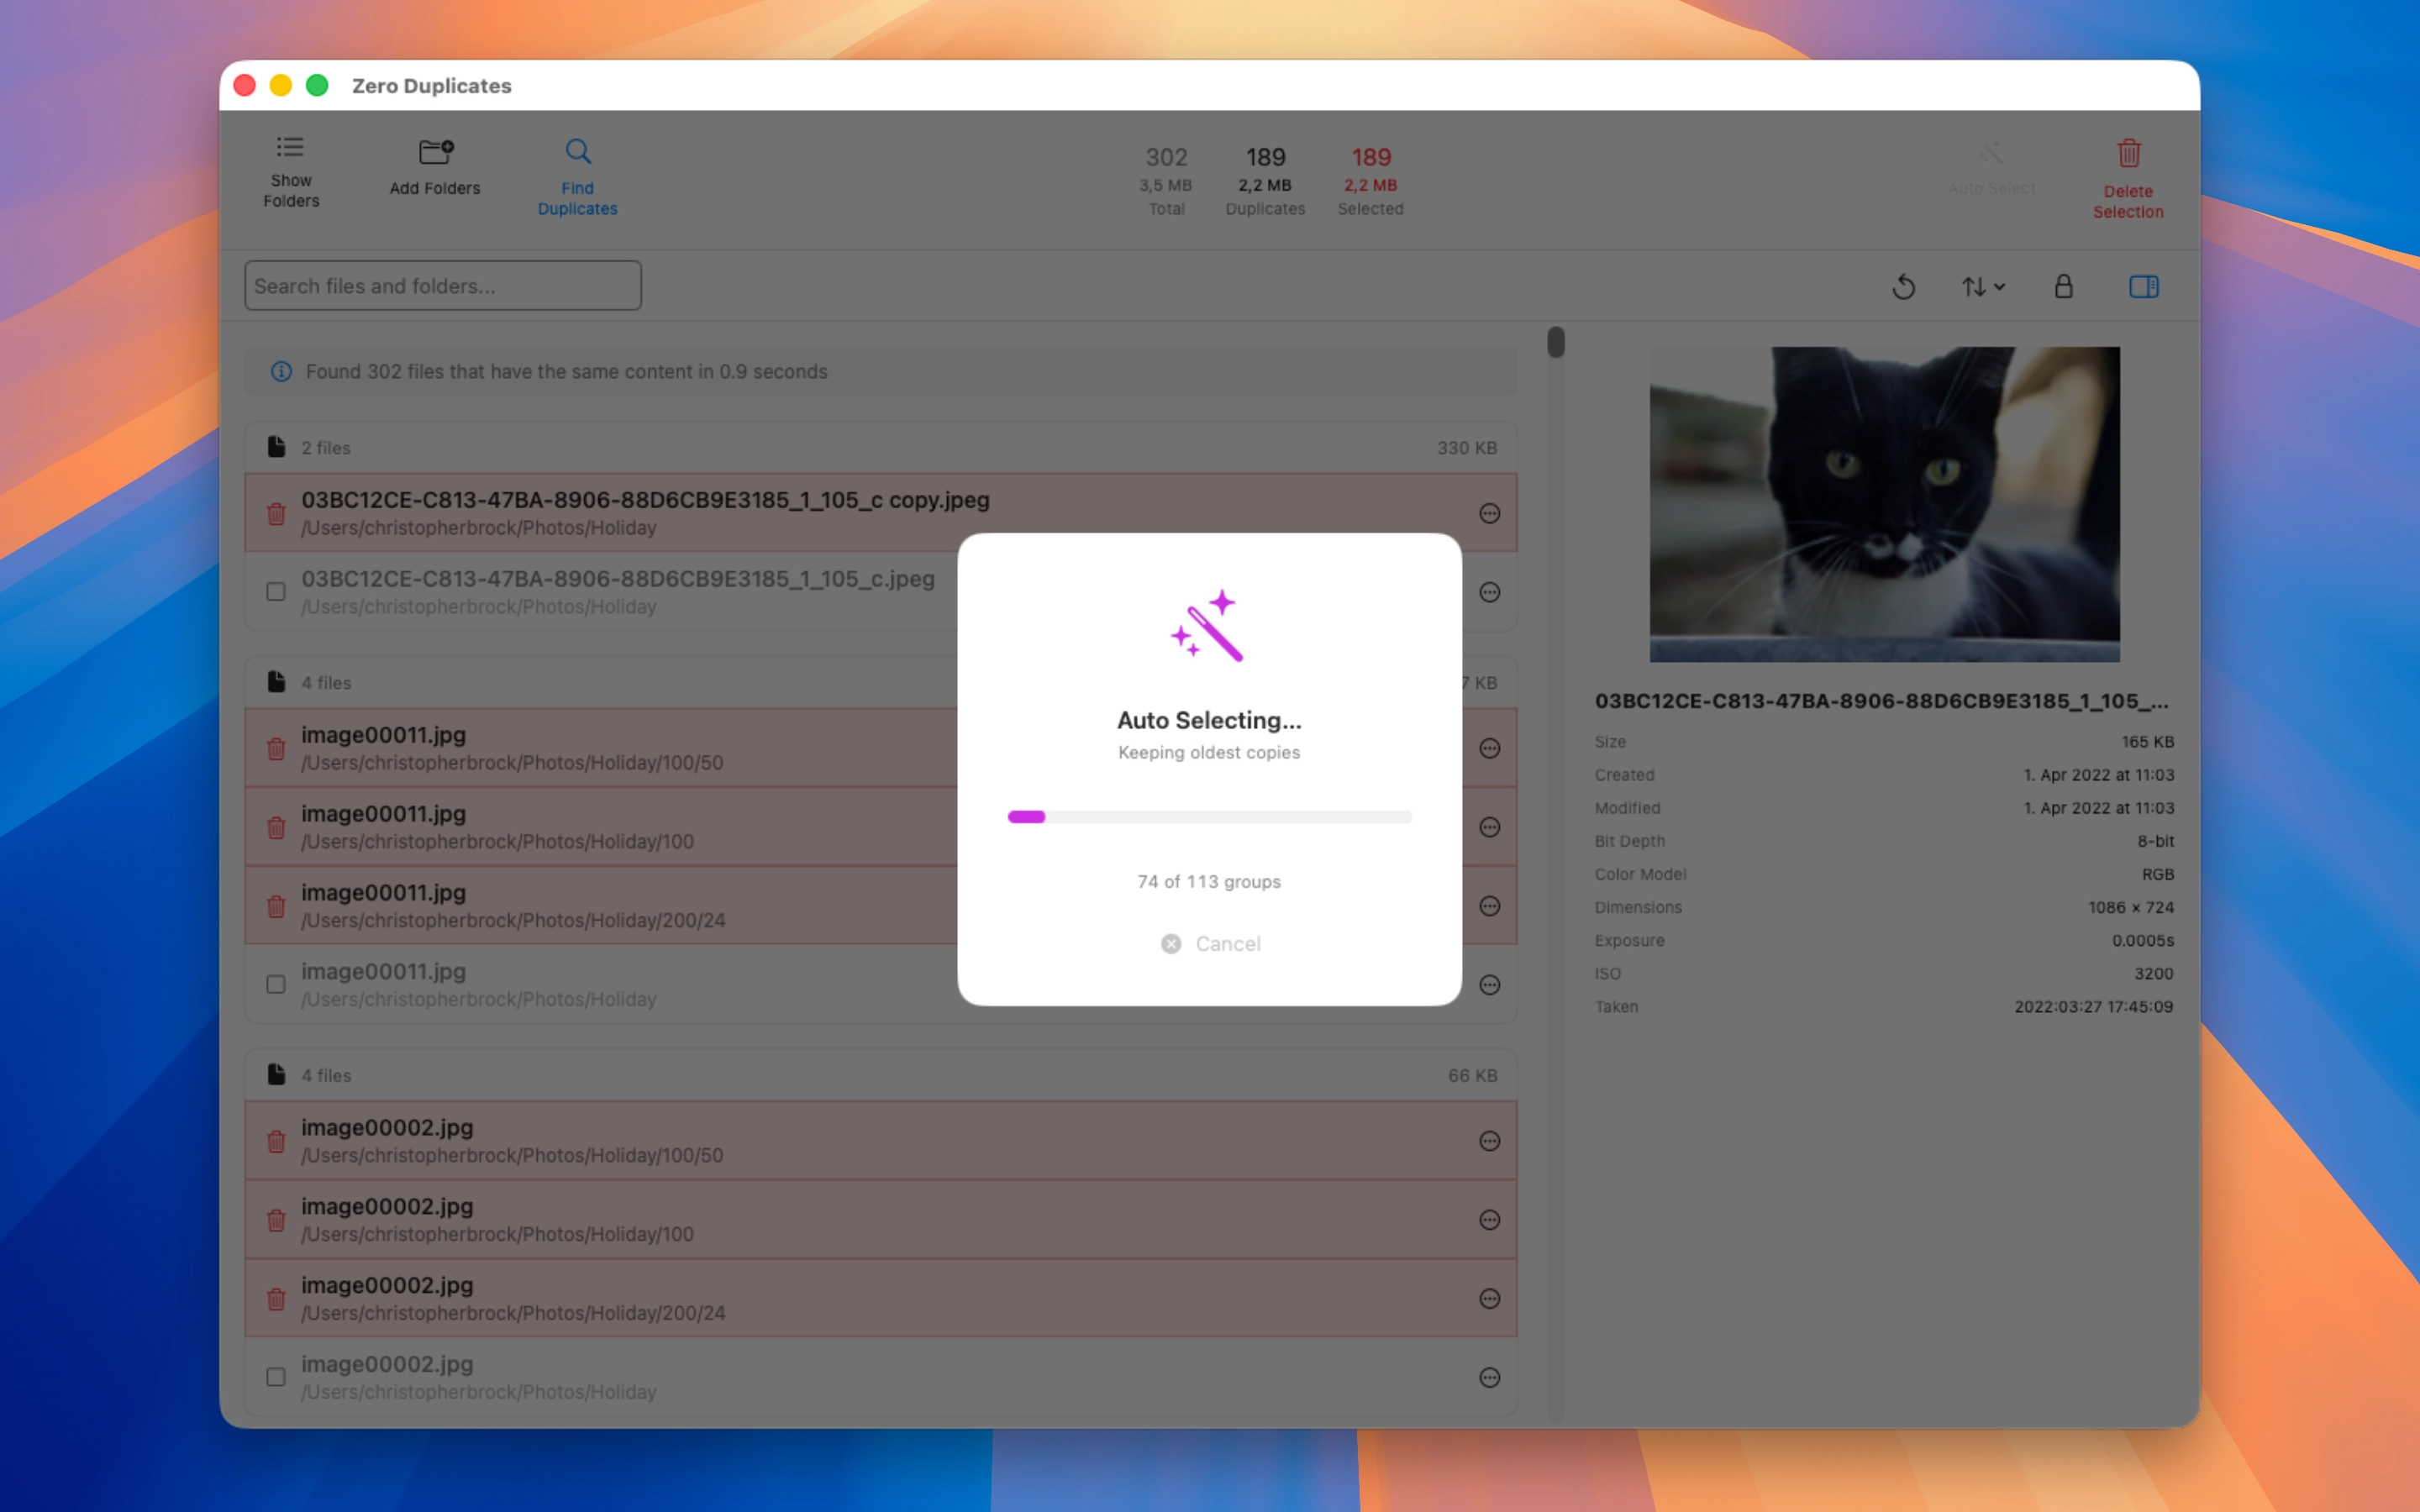
Click the "Auto Select" button in the toolbar (shown in purple in the interface).
-
Choose Your Mode
Select either "Keep Oldest" or "Keep Newest" based on which files you want to preserve.
-
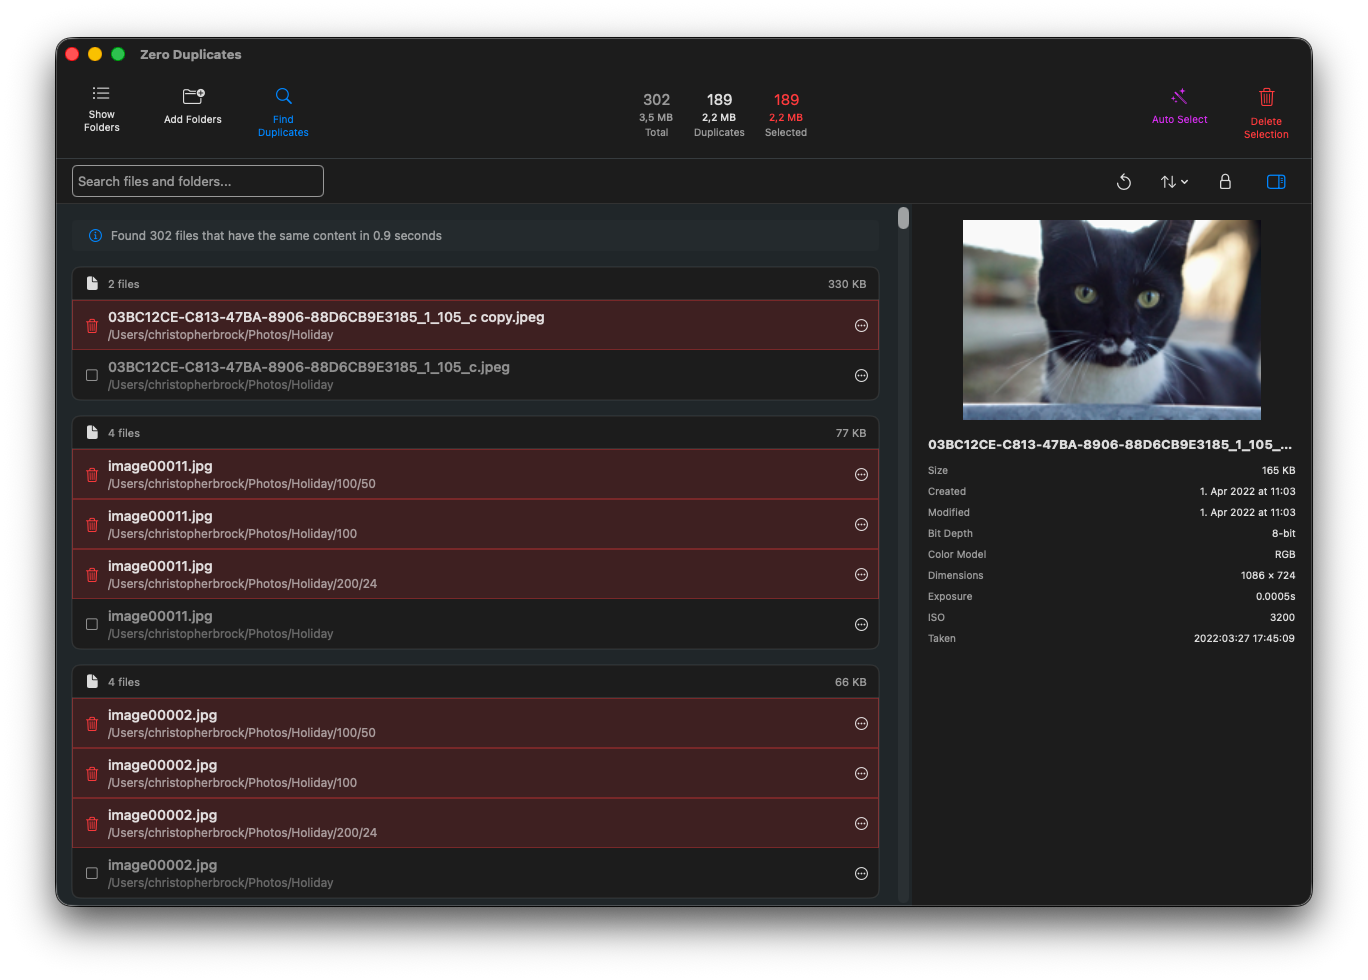
Wait for Processing
Auto Select processes all duplicate groups automatically. You'll see a progress indicator showing how many groups have been processed.

-
Review and Delete
Files marked for deletion appear highlighted in red. Review the selections to ensure they match your expectations, then click "Delete Selection" when ready.
Keep Oldest vs Keep Newest: Which to Choose?
Choose Keep Oldest when:
- Working with archives or backups where the original file matters
- Dealing with photos where creation date indicates when the photo was taken
- Managing historical documents where the first version is important
Choose Keep Newest when:
- Working with edited documents where recent changes matter
- Managing downloads where newer versions fix bugs or add features
- Dealing with files that get updated over time
If unsure, Keep Oldest is typically the safer choice for photos and personal documents, while Keep Newest works better for software, downloads, and work documents. Want to learn more about why Zero Duplicates stands out from other duplicate finders?
💡 Pro Tip: You can always deselect individual files after using Auto Select. The feature gives you a smart starting point, but you have full control to adjust selections before deleting.
Safety Built In
Auto Select includes multiple safety features to protect your files:
- Preview before deletion: Files are only marked, not deleted. You can review every selection.
- Safe Selection mode: By default, Zero Duplicates prevents selecting all copies of a file (keeps at least one).
- Move to Trash option: Choose to move files to Trash first for an extra safety net before permanent deletion.
- File previews: View any file before deciding to keep or delete it.
Learn more about how to safely delete duplicate files with Zero Duplicates.
Frequently Asked Questions
Is Auto Select safe to use?
Yes, Auto Select is completely safe. It only marks files for deletion without actually removing them. You always get to review every selection before confirming any deletions. Additionally, Zero Duplicates includes Safe Selection mode that prevents you from accidentally selecting all copies of a file.
Can I undo Auto Select selections?
Absolutely. After Auto Select runs, you can click any marked file to deselect it. You have complete control to adjust the selections before deleting anything. The feature gives you a smart starting point, but you make the final decision.
Does Auto Select delete files automatically?
No. Auto Select only marks files with red highlighting. Nothing gets deleted until you click “Delete Selection” and confirm. You can review, adjust, and verify every selection before any files are removed.
Which mode should I choose for photos?
For photos, Keep Oldest is usually the better choice because it preserves the file with the original creation date (when the photo was actually taken). This maintains your photo timeline accurately.
Does Auto Select work on external drives and cloud storage?
Auto Select works wherever Zero Duplicates can scan. On Mac, that includes external drives, USB drives, network drives, iCloud Drive, and synced cloud folders like Dropbox and Google Drive. On iPhone and iPad, it works for locations available to third-party apps in Files (such as iCloud Drive, On My iPhone/iPad, and external storage). Other cloud providers on iOS and iPadOS depend on their Files integration and system permissions.
Get Started with Auto Select
Auto Select is available now in Zero Duplicates for Mac, iPhone, and iPad. The core workflow is consistent across platforms, with available scan locations based on each platform’s file access permissions.


Stop Wasting Time on Manual Selection
Whether you have dozens or thousands of duplicate files, Auto Select handles them all in seconds. Download Zero Duplicates today and experience the fastest way to clean up duplicate files on your Mac, iPhone, or iPad.
Want to learn more? Check out the iOS app release announcement or discover other ways to free up storage space.